-
GENERAL QUESTIONS TO TECHNICAL ASSISTANCE
-
How to know which motor is installed?
You will find all useful information to identify the motor on its label
-
How to calculate the necessary motor torque?
Go to the dedicated page, and use the online calculator, the chart files or the personalized chart form
-
Where to find EC declarations?
Go to the dedicated page
-
Where to find a retailer?
Use the contact form to send your demand or contact one of our subsidiaries
-
How do after-sales service and warranty work?
If you are an INDIVIDUAL or a PROFESSIONAL NOT DIRECT CUSTOMER OF SIMU:
Please contact your installer or reseller to find out the warranty conditions he has granted you.
If you are A PROFESSIONAL DIRECT CUSTOMER OF SIMU:
The warranty conditions apply in full, write to us via the contact form
-
How to know which motor is installed?
-
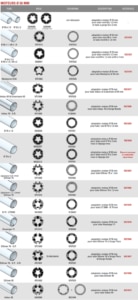
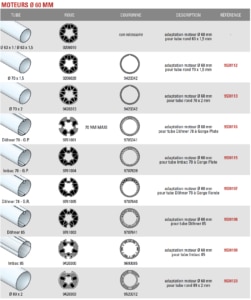
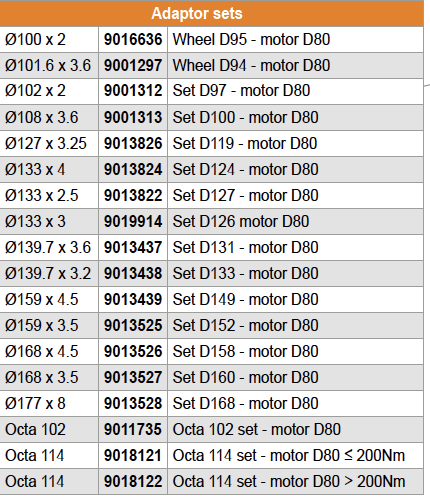
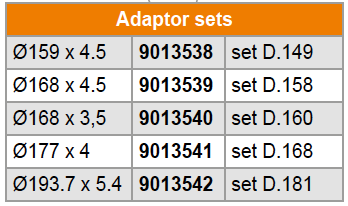
Adaptor Sets
-
Control board - Grouped control box
-
Technical information
- What are the detailed features of the product?
-
Which motors is this product compatible with?
Compatible with T3.5, T5, DMI5, T6, DMI6, T815, T8S, T8S DMI, CENTRIS M and CENTRIS L motors
-
Technical information
-
Transmitter - Wall 1&5C Hz&BHz
-
Technical information / Selection assistance
- What are the detailed features of the product?
-
How to see the difference between a Hz transmitter and a BHz transmitter?
The difference can been seen in the color of the led :
red light = Hz transmitter
green light = Bhz transmitter
-
Programming
-
How to add a transmitter?
1. Press the PROG button from the individual transmitter to the back-and-forth of the motor
2. Press the PROG button of the tranmitter to be added for 1 second : the motor turns in one direction and then in the other
The new transmitter is paired -
How to replace a faulty or lost transmitter on a radio motor?
1. Only on the motor concerned unplug the power supply 3 seconds
2. Plug in the power supply 8 seconds
3. Unplug the power supply 3 seconds
4. And then plug in the power supply : the motor turns in one direction and the other.
5. Press PROG on the new transmitter (about 3 seconds) : the motor turns in one direction and the other.
The new transmitter is paired
-
How to add a transmitter?
-
Replacement
-
Which product to replace an old transmitter?
Current Simu Hz transmitter can replace old products : beware the simu Bhz range is not compatible
– color +
– color
– mural ND
– timer Hz
– FRS
-
Which product to replace an old transmitter?
-
Technical information / Selection assistance
-
Transmitter - Timer easy - Timer multi
-
Technical information / selection assistance
- What are the detailed features of Timer-multi?
- What are the detailed features of Timer-easy?
-
What is the difference between both?
Timer-easy has one channel and allows one up and one down command per day. The scheduled times can be the same every day or different between work days and rest days
Timer-multi has 6 channels and allows up to 6 commands for each day of the week
- Documentation
-
Programming
-
How to add Timer-multi to my Hz motor?
1. Press the PROG (programming) button on the individual control until the motor turns back and forth.
2. Select the channel and Press the PROG (programming) button on Timer-multi for 1 second : the motor turns back and forth to confirm the addition.
3. Repeat the same operation on all shutters to be added.
Your Timer-multi is paired with the motor. -
How to add Timer-easy to my Hz motor?
1. Press the PROG (programming) button on the individual control until the motor turns back and forth.
2. Press the PROG (programming) button on the Timer-easy for 1 second : the motor turns back and forth to confirm the addition.
3. Repeat the same operation on all shutters to be added.
Your Timer-easy is paired with the motor. -
Is it possible to control several groups of motors?
It is possible to create up to 6 groups only with the Timer-multi
-
How many motors can my Timer-multi or Timer-easy control?
There is no limit on the number of products that can be controlled by a remote control, the only limit is the range which is ~ 200m free field and ~ 20m to cross 2 reinforced concrete wall (it depends of the environment and of the pollution)
-
How to add Timer-multi to my Hz motor?
-
Troubleshooting
-
My Timer doesn't pilot my motor anymore
Check theremote control’s battery and replace it if needed
Try to pair your remote again -
I can't add the remote control to my motor
Your motor memory may be full: 12 transmitters max
-
My Timer doesn't pilot my motor anymore
-
Technical information / selection assistance
-
Motor - AUTOSUN 2 solar solution
- TECHNICAL INFORMATION
- SELECTION ASSISTANCE
-
COMPATIBILITY
-
What is the AUTOSUN2 compatibility?
Compatibility with SOMFY controls
Somfy RTS controls are compatible with the SIMU Hz radio motor range, included Autosun.
Compatibility of the AUTOSUN 1 version with the AUTOSUN 2 version
To connect an AUTOSUN 2 motor to your AUTOSUN 1 installation
or to install an AUTOSUN 2 battery on your AUTOSUN 1 installation

-
What is the AUTOSUN2 compatibility?
-
DOCUMENTATION
-
Where can I find the product manual?
Find the product manuals on the dedicated product page
-
Where can I find the product manual?
-
Installation/ programming
-
HOW TO INSTALL A ROLLER SHUTTER EQUIPPED WITH AUTOSUN?
Find out how easy it is to install a roller shutter equipped with an independent tubular motor, thanks to its battery and solar panel!
-
HOW TO ADD A SECOND CONTROL POINT?
Add a second transmitter to your AUTOSUN 2 solar solution.
1. Press the PROG (programming) button on the individual control until the motor turns back and forth.
2. Press the PROG (programming) button on the control until the motor turns back and forth.
Your new transmitter is paired. -
HOW TO ADD A DIGICODE?
Steps to follow:
1.Open the Hz radio digicode with the key provided.
2. Presse the RESET button on the digicode for more than 1 second (behind the keyboard).
3. Press the individual transmitter PROG of the motor for 3 seconds => the motor turns in one direction and then in the other.
4. Type the factory code (000000) on the digicode.
5. Briefly press the digicode SET key.
6. Press the PROG button on the digicode for more than 1 second ( behind the digicode keyboard) => 1 led flashes.
7. During the flashing press one channel ( 1 of the 2 large buttons ) until the motor turns in one direction and then in the other.
8. The digicode is programmed. The code can be modified. -
HOW TO ADD A GENERAL REMOTE CONTROL?
1. Press the PROG (programming) button on the individual control until the motor turns back and forth.
2. Press the PROG (programming) button on the general remote control for 1 second; the motor turns back and forth to confirm the addition.
3. Repeat the same operation on all shutters to be added.
Please note, if you already have a multi-channel remote control, remember to select the right channel before pairing. -
HOW TO PAIR A TRANSMITTER FOLLOWING A MALFUNCTION OR LOSS OF THE INITIAL TRANSMITTER?
1. Disconnect the solar panel from the motor.
2. Disconnect the battery from the motor for 3 seconds.
3. Reconnect the battery to the motor for 8 seconds.
4. Disconnect the battery again from the motor for 3 seconds.
5. Reconnect the battery to the motor. The motor turns back and forth.
6. Press the PROG (programming) button on the new transmitter to be paired (approximately 3 seconds) until the motor turns back and forth once.
Your new remote control is paired with the motor.
7. Reconnect the solar panel again -
HOW TO REMOVE A CONTROL POINT?
1. Press the PROG (programming) button on the individual transmitter until the motor turns back and forth.
2. Press the PROG (programming) button on the transmitter to be removed for 1 second, the motor turns back and forth to confirm the removal.
The remote control is deprogrammed. -
WHICH END LIMIT SETTING MODE TO SELECT?
Discover the 4 different ways to adjust your engine from the Electronic radio engine range depending on your installation.
ALL-AUTOMATIC, SEMI-AUTOMATIC LOW, SEMI-AUTOMATIC HIGH and MANUAL Mode -
HOW TO PROGRAM THE MOTOR IN MANUAL MODE?
1. Press the UP and DOWN buttons simultaneously until the motor turns back and forth.
2. Check the rotation direction using the UP and DOWN buttons; if the direction is reversed, press the STOP button until the motor turns back and forth.
3. Using the UP and DOWN buttons, move the shutter to the desired low position: during this operation, continue to hold down the transmitter buttons to lower or raise the shutter.
4. Once the shutter is correctly positioned, press the STOP and UP buttons simultaneously until the shutter starts to move. The shutter should rise on its own (do not hold down the button).
5. Using the STOP button, stop the shutter at the top.
6. Using the UP and DOWN buttons, adjust the desired upper position.
7. Once the shutter is correctly positioned, press the STOP and DOWN buttons simultaneously until the shutter starts to move. The shutter should lower on its own (do not hold down the button).
8. When the shutter is at mid height, press the STOP button and hold it down until the motor turns back and forth (approximately 5 seconds).
9. Press the PROG (programming) button until the motor turns back and forth. The motor is programmed. -
HOW TO PROGRAM THE MOTOR IN FULLY AUTOMATIC MODE?
FULLY AUTOMATIC mode, when the upper and lower end limits are set automatically.
-
HOW TO PROGRAM THE MOTOR IN SEMI AUTO LOW MODE?
SEMI AUTO LOW mode, when only the LOWER end limit is set automatically.
-
HOW TO PROGRAM THE MOTOR IN SEMI AUTO HIGH MODE?
SEMI AUTO HIGH mode, when only the UPPER end limit is set automatically.
-
HOW TO REVERSE THE ROTATION DIRECTION WHEN THE MOTOR IS ALREADY PROGRAMMED?
1. Position the shutter at mid height.
2. Press the UP and DOWN buttons simultaneously until the motor turns back and forth.
3. Within maximum 2 seconds following the motion, press the STOP button until the motor turns back and forth again.
The rotation direction is reversed. -
HOW TO MODIFY THE END LIMITS?
The end limits can only be modified if the motor has been programmed in “manual” mode.
1. Position the shutter on its current end limit.
2. Press the UP and DOWN buttons at the same time until the motor turns back and forth.
3. Position your shutter in the new position using the UP and DOWN buttons.
4. Press the STOP button until the motor turns back and forth.
The new position is saved. -
HOW TO SAVE OR REMOVE AN INTERMEDIATE POSITION (PI)?
If you want to save or remove an intermediate position on a roller shutter equipped with the AUTOSUN 2 solar solution…
-
HOW TO CANCEL PROGRAMMING AND RETURN TO FACTORY SETTINGS (MOTOR RESET)?
1. Disconnect the solar panel from the motor.
2. Disconnect the battery from the motor for 3 seconds.
3. Reconnect the battery to the motor for 8 seconds.
4. Disconnect the battery again from the motor for 3 seconds.
5. Reconnect the battery to the motor. The motor turns.
6. Press the PROG (programming) button for approximately 10 seconds until the motor turns back and forth twice within a few seconds. The motor is in factory settings and ready to be programmed.
7. Reconnect the solar panel again -
HOW TO CHARGE A BATTERY?
1. Disconnect the battery from the motor.
2. Connect the battery to the charger reference 9020638. Minimum 3hrs.
3. Reconnect the battery to the motor.
After charging, the battery should have a voltage of around 13 volts. -
HOW TO PUT THE MOTOR RADIO ON STANDBY?
This is only possible within maximum 10 minutes after the motor programming and with a single control point paired:
Press the 3 UP/STOP/DOWN buttons simultaneously until the motor turns back and forth for around 3 seconds.
The motor is in standby.
Click here to watch the YOUTUBE tutorial -
HOW TO BRING THE MOTOR RADIO OUT OF STANDBY?
It is only possible to bring the radio out of standby if the panel is connected to the motor and illuminated, and can only be done with the transmitter paired during programming.
Press both the UP/DOWN buttons simultaneously until the motor turns back and forth for around 10 seconds.
The motor is reactivated.
-
HOW TO INSTALL A ROLLER SHUTTER EQUIPPED WITH AUTOSUN?
-
TROUBLESHOOTING
-
THE SHUTTER LOWERS WITH A JERKY MOTION
1. Check that there are no problems (slats that stick, for example)
2. Charge the battery. -
MY REMOTE CONTROLS DO NOT CORRECTLY CONTROL MY SHUTTERS AFTER I ADD A GENERAL REMOTE CONTROL
1. Disconnect the solar panel from the motor.
2. Disconnect the battery from the motor for 3 seconds.
3. Reconnect the battery to the motor for 8 seconds.
4. Disconnect the battery again from the motor for 3 seconds.
5. Reconnect the battery to the motor. The motor turns back and forth.
6. Press the PROG (programming) button on the individual transmitter for approximately 3 seconds until the motor turns back and forth once.
Your remote control is re-paired and the others no longer control the motor. -
THE MOTOR ASCENDS AFTER REACHING THE LOWER END LIMIT
1. Disconnect the solar panel from the motor.
2. Disconnect the battery from the motor for 3 seconds.
3. Reconnect the battery to the motor for 8 seconds.
4. Disconnect the battery again from the motor for 3 seconds.
5. Reconnect the battery to the motor. The motor turns back and forth.
6. Press the PROG (programming) button for approximately 10 seconds until the motor turns back and forth twice within a few seconds. The motor is in factory settings and ready to be programmed.
7. Fully program the motor. -
THE MOTOR NO LONGER RESPONDS TO COMMANDS
1. Check the remote control’s battery.
2. Check that the LED is flashing when you press a button on the remote control.
3. Check the motor/battery/panel connections.
4. Check the battery voltage: it must be over 11.5 volts.
5. Check the solar panel voltage: Panel voltage 21 volts +/- 10%. -
WHAT IS THE DIFFERENCE BETWEEN AUTOSUN 1 AND AUTOSUN 2?
1. Check the motor connectors:
Autosun 1 motor => One 4-point connector.
Autosun 2 motor => Two 2-point connectors.
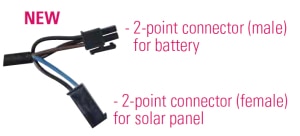
Check the battery:
Autosun 1 battery => presence of a small printed circuit board with a reset button.
Autosun 2 battery => no printed circuit board. -
HOW TO MODIFY YOUR AUTOSUN 1 INSTALLATION?
To connect an AUTOSUN 2 motor to your AUTOSUN 1 installation or to install an AUTOSUN 2 battery on your AUTOSUN 1 installation

Click here to see how to replace the battery
Click here to see how to replace the motor -
HOW TO REPLACE THE AUTOSUN 1 MOTOR WITH THE NEW AUTOSUN 2 MOTOR?
How to replace the motor of your AUTOSUN 1 solar solution with the new AUTOSUN 2 motor?
-
HOW TO REPLACE THE AUTOSUN 1 BATTERY WITH THE NEW AUTOSUN 2 BATTERY?
How to replace the battery of your AUTOSUN 1 solar solution with the new AUTOSUN 2 battery?
-
THE SHUTTER LOWERS WITH A JERKY MOTION
-
Motor - Simubox
- Technical information / selection assistance / compatibility
-
-
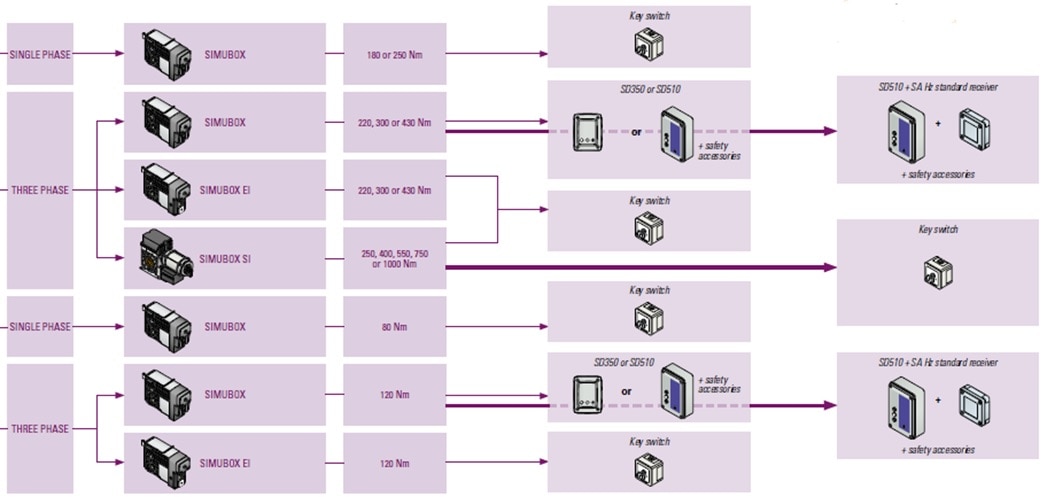
How to wire this product?
SINGLE-PHASE SIMUBOX
Traction stop has to be used
THREE-PHASE SIMUBOX
Traction stop has to be used.
Secu Mot inpiuts have to be wired in order to operate the motor
It’s imperative to install a control box with the motor
Three-phase SIMUBOX EI
Traction stop has to be used
Secu Ext inpputs have to be wired in order to operate the motor
-
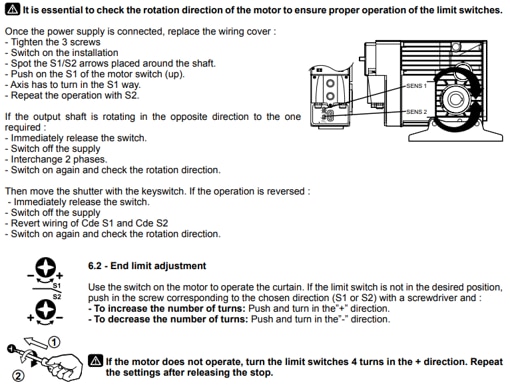
How to adjust the end-limits?
SINGLE-PHASE SIMUBOX
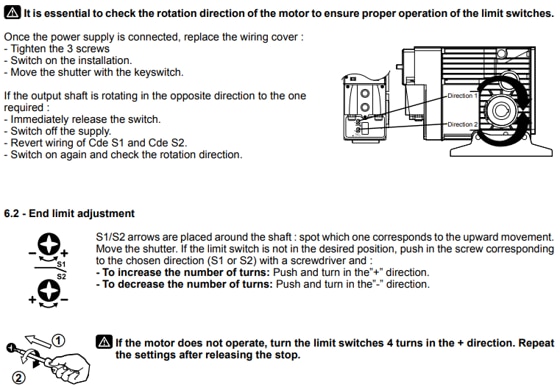
THREE-PHASE SIMUBOX
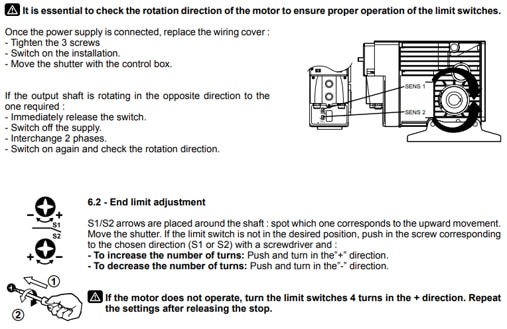
It’s imperative to install a control box with the motor
Three-phase SIMUBOX EI
-
The motor doesn't move
The motor may be in thermal cut-out : wait for the motor to cool
Check that the manual override is released
If the motor doesn’t move, do 4 turns in the + direction on the limit switches. Then set the limit switches.
Check the continuity of the safety brakes contact
-
I can't adjust the limit switches
Refer to manual
-
Motor - Centris central motor
-
Motor - T3.5 AC
- Technical information / Selection assistance
- Documentation
-
Installation / setting
-
Wiring precautions
-
How to wire a reversing switch?

Invert wire 1 and 2 if the motor does not turn in the good direction
-
How to set the end-limits?

1. Setting upper end limits : press the button on the control point to raise the motorised product to the upper end limit and turn the corresponding setting screw to set the required upper end limit.
2. Setting lower end limits : press the button on the control point to lower the motorised product to the lower end limit and turn the corresponding setting screw to set the required lower end limit.
*Trick* to increase the end limits, turn setting screw clockwise and vice versa
-
Wiring precautions
-
Troubleshooting
-
The motor only runs one way
Check the wiring between the motor and the direct control and test the motor connecting it directly to an electrical source
-
The motor only runs one way
-
Motor - GM600-GM800-GM1000 for garage door
- Documentation
-
Installation/ Settings - Sequential remote control
-
How to add a sequential remote control?
On a GM 600
1. Press GM’s B button until light turns on
2. Press the chosen button on the new transmitter => the light flashes 5s and turns offOn a GM 800
1. Press GM’s PROG button until light turns on
2. Press the chosen button on the new transmitter => the light flashes 5s and turns offOn a GM 1000
1. Press 2s on the GM PROG button => the light turns on and F0 appears
2. Press the chosen button on the new transmitter => the light flashes 5s and 2 dashes appear on the screen and then C1 appears.
-
How to add a sequential remote control?
-
Troubleshooting
-
How to add a digicode on a GM 600?
1. Open the digicode with the key provided
2. Press the digicode RESET button for more then 1 second (behind the keyboard)
3. Unlock the digicode with the factory code (000000)
4. Press GM’s B button until light turns on
5. Press the chosen channel (1 of 2 large buttons) of the digicode => the light flashes 5s and turns off
6. Change factory code -
How to add a digicode on a GM 800?
1. Open the digicode with the key provided
2. Press the digicode RESET button for more then 1 second (behind the keyboard)
3. Unlock the digicode with the factory code (000000)
4. Press GM’s PROG button until light turns on
5. Press the chosen channel (1 of 2 large buttons) of the digicode => the light flashes 5s and turns off
6. Change factory code -
How to add a digicode on a GM 1000?
1. Open the digicode with the key provided
2. Press the digicode RESET button for more then 1 second (behind the keyboard)
3. Unlock the digicode with the factory code (000000)
4. Press 2s on the GM PROG button => the light turns on and F0 appears
5.Press the chosen channel (1 of 2 large buttons) of the digicode => the light flashes 5s and 2 dashes appear on the screen and then C1 appears.
6. Change factory code
-
How to add a digicode on a GM 600?
-
The door opens on its own after reaching the down end limit
Do a resetting all settings and do a new programming because the door forces on the threshold which triggers the detection of obstacles
-
The door opens on its own
Do a resetting all settings and do a new programming
-
Scope problem
Add a deported antenna reference 9015167 8m cable length
-
Motor - T3.5 Hz02
- Technical information / Selection assistance
- Documentation
-
Installation / programming
-
How to wire this product?

-
How to program this product?
1. Press the UP and DOWN buttons simultaneously until the motor turns back and forth.
2. Check the rotation direction using the UP and DOWN buttons; if the direction is reversed, press the STOP button until the motor turns back and forth.
3. Using the UP and DOWN buttons, move the shutter in the desired low position: during this operation, continue to hold down the transmitter buttons to lower or raise the shutter.
4. Once the shutter is correctly positioned, press the STOP and UP buttons simultaneously until the shutter starts to move. The shutter should rise on its own (do not hold down the button).
5. Using the STOP button, stop the shutter at the top.
6. Using the UP and DOWN buttons, adjust the desired upper position.
7. Once the shutter is correctly positioned, press the STOP and DOWN buttons simultaneously until the shutter starts to move. The shutter should lower on its own (do not hold down the button).
8. When the shutter is at mid height, press the STOP button and hold it down until the motor turns back and forth (approximately 5 seconds).
9. Press the PROG (programming) button until the motor turns back and forth. The motor is programmed. -
How to modify the end limits?
1. Let the shutter stop on the end limit position you want to change.
2. Press the UP and DOWN buttons simultaneously until the motor turns back and forth.
3. Adjust the end limit position using the UP and DOWN buttons.
4. Press the STOP button until the motor turns back and forth to save the new end limit. -
How to remove a control point?
1. Press the PROG (programming) button on the individual transmitter until the motor turns back and forth.
2. Press the PROG (programming) button on the transmitter to remove for 1 second, the motor turns back and forth to confirm the removal.
The remote control is deprogrammed. -
How to add a general remote control?
1. Press the PROG (programming) button on the individual transmitter until the motor turns back and forth.
2. Press the PROG (programming) button on the transmitter to remove for 1 second, the motor turns back and forth to confirm the removal.
The remote control is deprogrammed. -
How to pair a transmitter following a malfunction or loss of the initial transmitter?
1. Disconnect the power supply only on the motor concerned for 3 seconds.
2. Reconnect the power supply for 8 seconds.
3. Disconnect the power supply again for 3 seconds.
4. Finally reconnect the power supply. The motor turns back and forth.
5. Press the PROG (programming) button on the new transmitter to be paired (approximately 3 seconds) until the motor turns back and forth.
Your new remote control is paired with the motor.
-
How to wire this product?
-
Troubleshooting
-
My motor does not respond to commands from my remote control
1. Check the remote control’s battery.
2. Check that the LED is flashing when you press a button on the remote control.
3. Check the mains voltage. -
My motor has lost the end limits
1. Disconnect the power supply only on the motor concerned for 3 seconds.
2. Reconnect the power supply for 8 seconds.
3. Disconnect the power supply again for 3 seconds.
4. Finally reconnect the power supply. The motor turns back and forth.
5. Press the PROG (programming) button on the new transmitter to be paired (approximately 3 seconds) until the motor turns back and forth.
6. Program the motor -
My motor stops after a few seconds of operation
Check the drive betwween the adaptation crown and the tube
-
My motor does not stay in its lower position, it rises on its own
1. Disconnect the power supply only on the motor concerned for 3 seconds.
2. Reconnect the power supply for 8 seconds.
3. Disconnect the power supply again for 3 seconds.
4. Finally reconnect the power supply. The motor turns back and forth.
5. Press the PROG (programming) button on the new transmitter to be paired (approximately 3 seconds) until the motor turns back and forth.
6. Program the motor
-
My motor does not respond to commands from my remote control
-
Motor - T5 Auto
- Technical information / selection assistance
- Documentation
-
Installation / setting
-
How to wire this product?
-
How to set the end-limits?

After the first two consecutive and complete opening and closing of the shutter :
– The motor memorizes automatically the end limit (up and down) positions
– The “STOP on obstacle” function is activated
-
How to wire this product?
-
Troubleshooting
-
How to cancel the automatic settings?
– Press 3 consecutive times, for 1s, each time, on the UP key. the moto runs briefly at each press.
– Press 3 consecutive times on the DOWN key. The first two press for 1s. (the motor runs briefly at each press) and the third press for 2s. The motor runs twice in the same direction -
The limit switches are shifted
Check the drive between the adaptation crown and the tube
-
Motor does not move when pressed on control point
Check the correct operation of the control by connecting the motor directly to the power supply
-
The rolling shutter doesn't move up
Check the correct operation of the control by connecting the motor directly to the power supply
-
How to cancel the automatic settings?
-
Motor - DMI5-DMI6
-
Installation / Setting
-
How to wire this product?
-
How to set the end-limits?
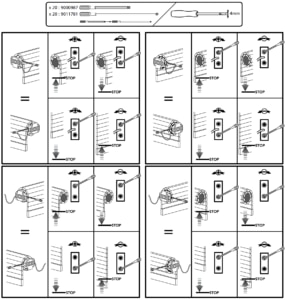
1. Setting upper end limits : press the UP button on the control point to raise the motorised product to the upper end limit and turn the corresponding setting screw to set the required upper end limit.
2. Setting lower end limits : press the DOWN button on the control point to lower the motorised product to the lower end limit and turn the corresponding setting screw to set the required lower end limit.
*Trick* to increase the end limits, turn setting screw clockwise and vice versa
-
How to wire this product?
-
Troubleshooting
-
The motor only runs one way
1. Check the wiring between the motor and the direct control
2. Test the motor connecting it directly to an electrical source -
The motor stops and no longer moves
The motor may be in thermal cutout safety : let it cool down and try again
-
The motor has lost the adjustment of its limit switches
1. The crown of the adaptor set is not correctly fixed on the motor base crown or on the tube : check the fixations of the crown on the motor base crown or on the tube.
2. Make sure multiple motors are not plugged on the same wired direct control -
When the manual override is used, is the motor always powered up?
Yes it is
-
Warning
If the manual override is used, the limit switches may be out of ajdustment
-
The motor only runs one way
-
Installation / Setting
-
Motor - T5 T6
-
Technical information / selection assistance / compatibility
- What are the detailed features of the product?
- Which product is right for you?
-
Which is the compatibility with a wired control point of another brand?
Check with the manufacturer of the control point using the characteristics of our products
- Documentation
-
Installation / setting
-
What are the wiring precautions to take?
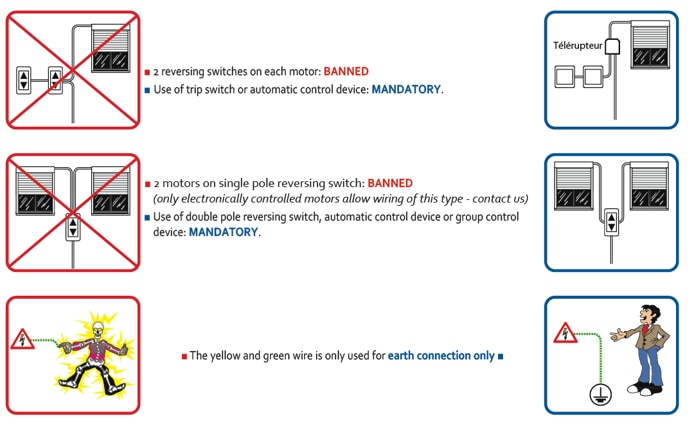
-
How to wire with a reversing switch?
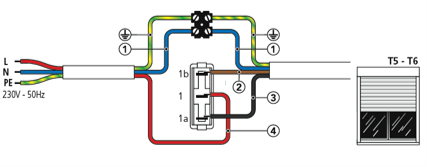

Invert wire 1 and 2 if the motor dos not turn in the good direction
-
How to set the end-limits?
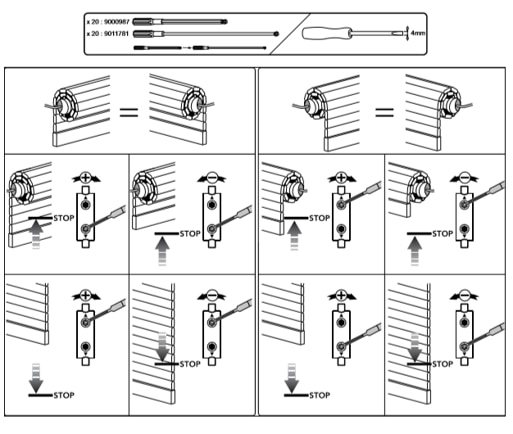
1. Setting upper end limits : press the UP button on the control point to raise the motorised product to the upper end limit and turn the corresponding setting screw to set the required upper end limit.
2. Setting lower end limits : press the DOWN button on the control point to lower the motorised product to the lower end limit and turn the corresponding setting screw to set the required lower end limit.
*Trick* to increase the end limits, turn setting screw clockwise and vice versa
-
What are the wiring precautions to take?
-
Troubleshooting
-
The power supply switches off
Connect the motor directly to the electrical source to check that it is working properly
-
The motor has difficulty to go up
Check the motor torque according to the weight of the shutter
Check if there no hard point in the installation -
The rolling shutter doesn't hold its upper end position
Contact your reseller. Replace the motor.
-
The motor no longer stops at its limit switch
Set the limit ends
-
The power supply switches off
-
Replacement
-
Replacement T5 / T6
Check if you have to replace also the adapter set
-
Replacement T5 / T6
-
Technical information / selection assistance / compatibility
-
Motor - T5 Hz02
-
Technical information / Selection assistance / compatiblity
- What are the detailed features of the product?
- Which product is right for you?
-
What is the difference with a T5 EHZ?
The T5Hz02 motor only has a manual mode for programming the limit switches unlike a T5Ehz which has 4 modes for adjusting the limit switches : manual, automatic or 2 semi-automatic modes
-
Which controls is this product compatible with?
Compatible with all Simu Hz and Somfy RTS control points
- Documentation
-
Installation / programming
-
How to wire this product?
-
How to program this product?
1. Press the UP and DOWN buttons simultaneously until the motor turns back and forth.
2. Check the rotation direction using the UP and DOWN buttons; if the direction is reversed, press the STOP button until the motor turns back and forth.
3. Using the UP and DOWN buttons, move the shutter in the desired low position: during this operation, continue to hold down the transmitter buttons to lower or raise the shutter.
4. Once the shutter is correctly positioned, press the STOP and UP buttons simultaneously until the shutter starts to move. The shutter should rise on its own (do not hold down the button).
5. Using the STOP button, stop the shutter at the top.
6. Using the UP and DOWN buttons, adjust the desired upper position.
7. Once the shutter is correctly positioned, press the STOP and DOWN buttons simultaneously until the shutter starts to move. The shutter should lower on its own (do not hold down the button).
8. When the shutter is at mid height, press the STOP button and hold it down until the motor turns back and forth (approximately 5 seconds).
9. Press the PROG (programming) button until the motor turns back and forth. The motor is programmed. -
How to add a general remote control?
1. Press the PROG (programming) button on the individual control until the motor turns back and forth.
2. Press the PROG (programming) button on the general remote control for 1 second; the motor turns back and forth to confirm the addition.
3. Repeat the same operation on all shutters to be added.
Please note, if you already have a multi-channel remote control, remember to select the right channel before pairing. -
How to remove a remote control?
1. Press the PROG (programming) button on the individual transmitter until the motor turns back and forth.
2. Press the PROG (programming) button on the transmitter to remove for 1 second, the motor turns back and forth to confirm the removal.
The remote control is deprogrammed.
-
How to wire this product?
-
Troubleshooting
-
My motor does not respond to commands from my remote control
1. Check the remote control’s battery.
2. Check that the LED is flashing when you press a button on the remote control.
3. Check the mains voltage.
-
My motor does not respond to commands from my remote control
-
Technical information / Selection assistance / compatiblity
-
Motor - MSR (ANTERIOR PRODUCT)
-
Documentation
-
Warning
The setting of the end limits of the motor is automatic and requires he presence of bottom slat stop and rigid fasteners between the rolling shaft and the shutter.
-
Warning
-
Installation/ Setting
-
Replacement
-
How to reset a motor?
1. Remove the motor from the axis and push the red ergot
2. Using a 2mm Allen key proceed as follows :
– Introduce the key into the yellow screw print, push on the key and at the same time turn it in the clockwise direction.
– Introduce the key into the white screw print, push on the key and at the same time turn it in the anti-clockwise direction.
3. Put the motor in the tube ans the tube to the original position and hang up the apron
4. Turn the motor in the up : you hear clac clac clac …. the motor works in reduce torque during the first cycle : you may have to help it by lifting the apron,
5. Make a complete cycle
-
Documentation
-
Motor - CENTRIS veoHz radio central motor (ANTERIOR PRODUCT)
-
How is the installation of the motor on the tube?
The motor installation on the tube is identical to a wired Centris.
-
Is there a signal to indicate that the transmitter battery is low?
The autonomy of the control points is at least 2 years.
When the battery is low, 2 signals appear:
– A change in the flashing LED means that the battery is low.
– When you need to restart the motor movement every 3s, the transmitter battery must be changed. -
What are the specificities of the veoHz radio?
– The remote control and the control box are specific veoHz (SIMU radio protocol in 434MHz, not compatible with Hz).
– Centris veoHz can not be controlled by other control points that veoHz transmitters and vice versa.
– These control points can transmit continuously 60s.
– The motors settings can be made from all veoHz control points (3 SIMU ergonomic buttons).
– The mobile transmitters have a very short range adjustable during the installation. -
Is it possible to adjust the radio range?
– By default, the transmitters are settled in threshold 2 and have a short radio range.
– 4 thresholds are available, the threshold 4 corresponds to the longest radio range.
– If the radio range is too short or too long it can be settled but it has a duty to guarantee an insight control of the shutter.
(more details on the video of the motor’s setting). -
Is the connection of wired control points possible?
The connection of wired control points, sensors, automatisms or safety accessories is not possible because not necessary.
-
Is the rise in impulse mode used on the grilles?
The mixed mode (rise in impulse mode) is strictly forbidden on grilles or curtains with a hook point.
-
How does the motor react during a power failure?
In case of extended power failure, the curtain can only go upward to the upper stop points (stop points are mandatory). Centris veoHz will then work as usual.
-
How is the installation of the motor on the tube?
-
Command - LiveIn2 connected solution (ANTERIOR PRODUCT)
-
HOW TO USE LIVEIN2?
Replacing LiveIn2, SIMU Hz and BHz products and accessories become compatible with Somfy’s TaHoma® Switch.
-
HOW TO USE LIVEIN2?
-
Command - SA Hz radio Keypad (ANTERIOR PRODUCT)
-
Technical informations / Compatibility
- What are the detailed features of the product?
-
With which motors is this product compatible?
All Simu HZ or Somfy RTS radio motors
- Documentation
-
Installation / programming
-
How to program this product on a rolling shutter radio motor?
1. Open the radio keypad with the key provided
2. Press the RESET button on the radio keypad for more than 1 second (behind the keyboard)
3. Press the PROG button on the transmitter for 3s => the roller shutter moves up and down
4. Enter the factory code (000000) on the keypad
5. Briefly press the SET key
6. Press the PROG button on the radio keypad for more than 1 second (behind the keyborad) => one of the LEDS flashes
7. During the flashing press the selected channel (1 of the 2 large buttons) on the radio keypad until the roller shutter moves up and down
8. The radio keypad is programmed. Factory code can be changed. -
How to program this product on a RSA Hz?
1. Open the radio keypad with the key provided
2. Press the RESET button on the radio keypad for more than 1 second (behind the keyboard)
3. Enter the factory code (000000) on the keypad
4. Select the P8 parameter of the RSA
5. Keep pressing the selected channel (one of the 2 large buttons) of the keypad (the 00 on the RSA becomes fixed) and press the + on RSA until 2 dashes appear.
6. The radio keypad is programmed. Factory code can be changed. -
How to program this product on a GM 600?
1. Open the radio keypad with the key provided
2. Press the RESET button on the radio keypad for more than 1 second (behind the keyboard)
3. Enter the factory code (000000) on the keypad
4. Press GM600 button B until the light turns on
5. Press the selected channel (one of the 2 large buttons) on the keypad => the light flashes 5s and goes out
6. Factory code can be changed. -
How to program this product on a GM 800?
1. Open the radio keypad with the key provided
2. Press the RESET button on the radio keypad for more than 1 second (behind the keyboard)
3. Enter the factory code (000000) on the keypad
4. Press the PROG button on the GM800 until the light turns on
5. Press the selected channel (one of the 2 large buttons) on the keypad => the light flashes 5s and goes out
6. Factory code can be changed. -
How to program this product on a GM 1000?
1. Open the radio keypad with the key provided
2. Press the RESET button on the radio keypad for more than 1 second (behind the keyboard)
3. Enter the factory code (000000) on the keypad
4. Press 2s on the GM1000 PROG button => the light comes on and F0 displayes
5. Press on the selected channel (one of the 2 larg buttons) of the keypad => the light flashes for 5s and 2 dashes appear on the RSA then C1 is displayed
6. Factory code can be changed. -
How to change the main code?
1. Enter the factory code 000000 and confirm with the SET key
2. Press the SET button until the bottom LED flashes
3. Enter the new code and confirm with the SET key
4. Confirm the new code and confirm again with the SET key
5. The code is changed
-
How to program this product on a rolling shutter radio motor?
-
Technical informations / Compatibility
-
Control board - RSA Hz & RSA Hz PRO (ANTERIOR PRODUCT)
-
TECHNICAL INFORMATION / SELECTION ASSISTANCE / COMPATIBILITY
-
What are the detailed features of the product?
Visit the dedicated product page
RSA Hz
RSA Hz PRO -
Which product is right for you?
That depends on the power of the motor.
If the motor power is above 750 Watts, you should choose the RSA PRO.
Refer to the product specification sheet for more information.Click here —> Product specification sheet
-
Which motors and controls is this product compatible with?
Compatibility with Somfy products
RSA Hz units are compatible with Somfy RTS remote controls and wired motors with mechanical end limits.
Compatibility with SIMU motors
RSA Hz units are compatible with all SIMU single-phase wired motors with mechanical end limits, excluding the SIMUBOX range.
-
What are the detailed features of the product?
-
DOCUMENTATION
-
Where can I find the product manual?
Click here to download the manual —> RSA Hz
Click here to download the manual —> RSA Hz PRO
-
Where can I find the product manual?
-
INSTALLATION / PROGRAMMING
-
RSA Hz and RSA Hz PRO quick programming
Check out the programming guide
Click here -
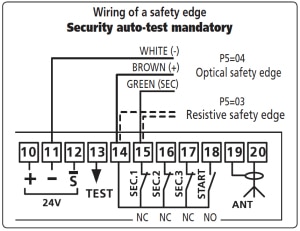
HOW TO WIRE A SAFETY EDGE?
Explanory diagram
-
HOW TO ACTIVATE A SAFETY EDGE?
Optical safety edge: Setting P1 = 02
Setting P5 = 04
Resistive safety edge: Setting P1 = 02
Setting P5 = 03 -
HOW TO ADD A SEQUENTIAL REMOTE CONTROL?
Steps to follow: Setting P0 on 00, 01, 02 or 03.
1. Go to setting P8, 00 flashes.
2. Press the button on your remote control until 00 stays lit.
3. Without releasing the button on your remote control; press + on the unit until two lines (–) appear.
4. Release, then using the scroll arrows, go to C1 and test your remote control.
5. Repeat the same operation with the other remote controls.

-
HOW TO ADD A FUNCTIONAL REMOTE CONTROL?
Steps to follow: Setting P0 on 04
1. Go to setting P8, 00 flashes.
2. Press the Up button on your remote control until 00 stays lit.
3. Without releasing the button on your remote control; press + on the unit until two lines (–) appear.
4. On setting P8, with the + button, scroll to 01 and program the Down button in the same way as the Open button.
5. On setting P8, with the + button, scroll to 02 and program the Stop button.
6. Using the scroll arrows, go to C1 and test your remote control.

-
HOW TO ADD A DIGICODE?
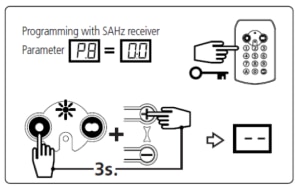
Click here to download the manual
—> Digicode -
HOW TO CONNECT PHOTOELECTRIC CELLS?
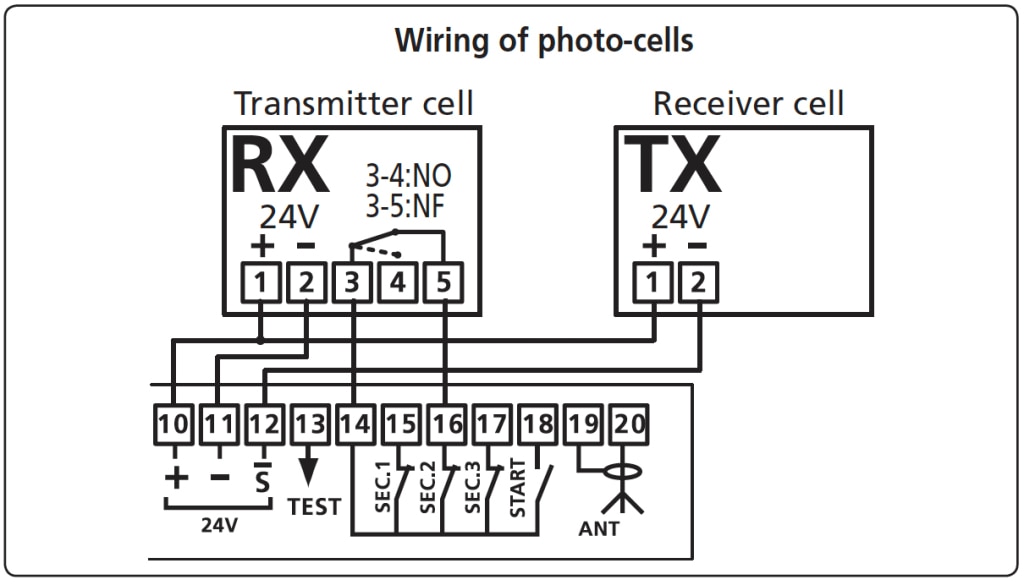
Click here to download the manual
—> CELL MASTER PRO BITECH -
HOW TO ACTIVATE PHOTOELECTRIC CELLS?
Steps to follow:
Setting P2 = 02
Setting P6 = 03 -
HOW TO CONNECT REFLEX CELLS?
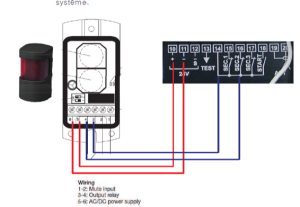
Click here to download the manual
—> REFLEX CELL -
HOW TO ACTIVATE REFLEX CELLS?
Steps to follow :
The two switches of the reflex photocells should be on OFF position
Parameter P2 = 02
Parameter P6 = 00 -
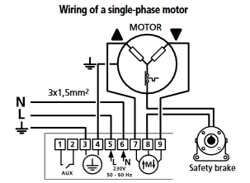
HOW TO WIRE A SAFETY BRAKE ?
Wiring on monophase motor :
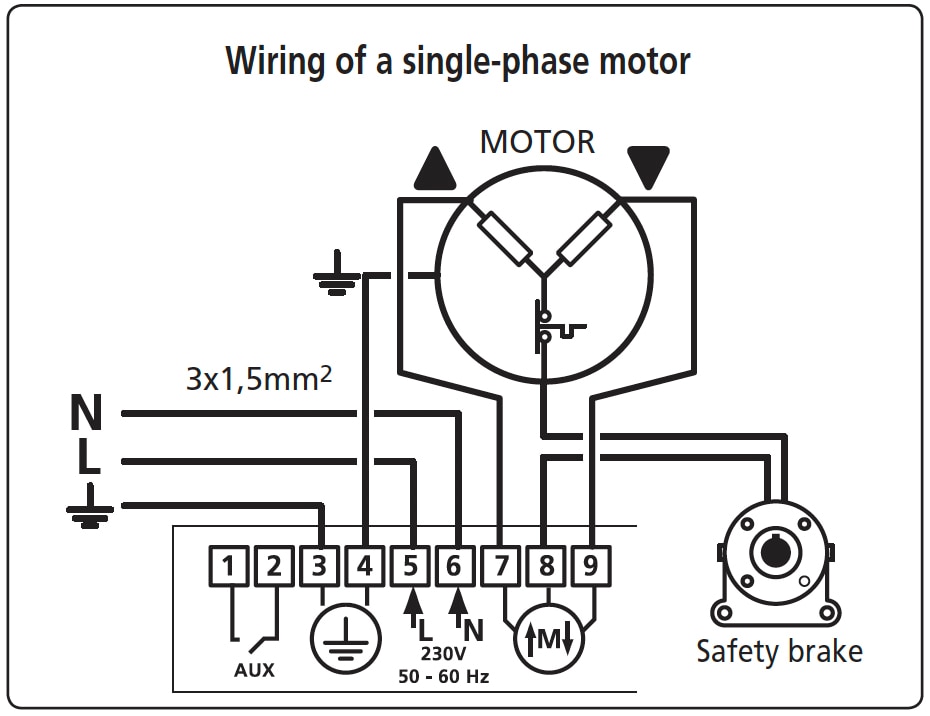
-
HOW TO WIRE AN ORANGE SIGNAL LIGHT AND/OR AREA LIGHTING?
Steps to follow:
Without area lighting: PA 03
With area lighting: PA 04
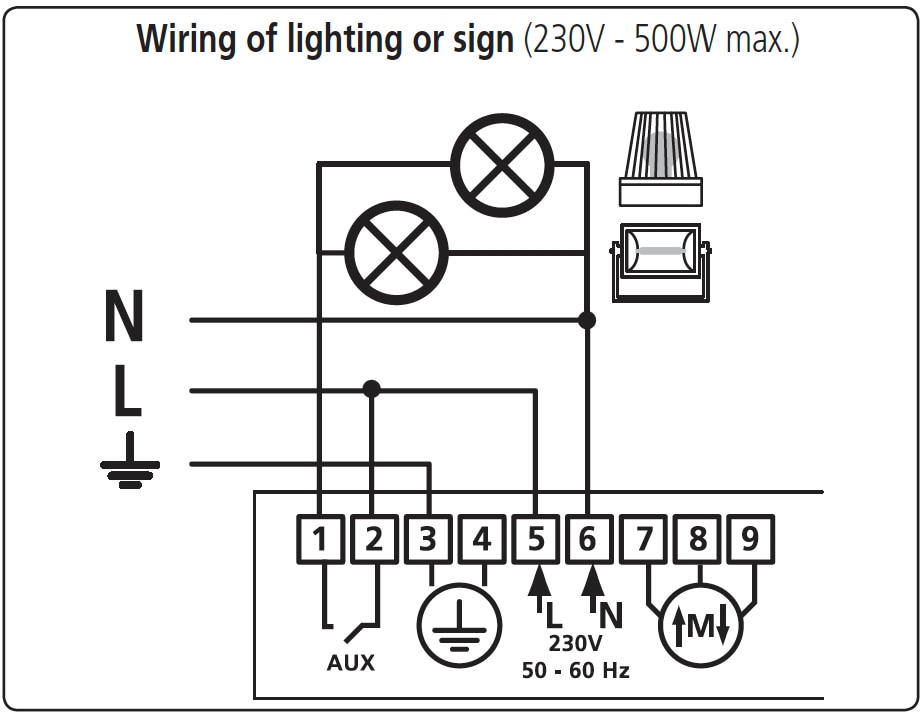
Click here to download the manual
—> SIGNAL LIGHT -
HOW TO WIRE A SEQUENTIAL CONTROL POINT?
To use a sequential mode P0≠05 and P0≠04
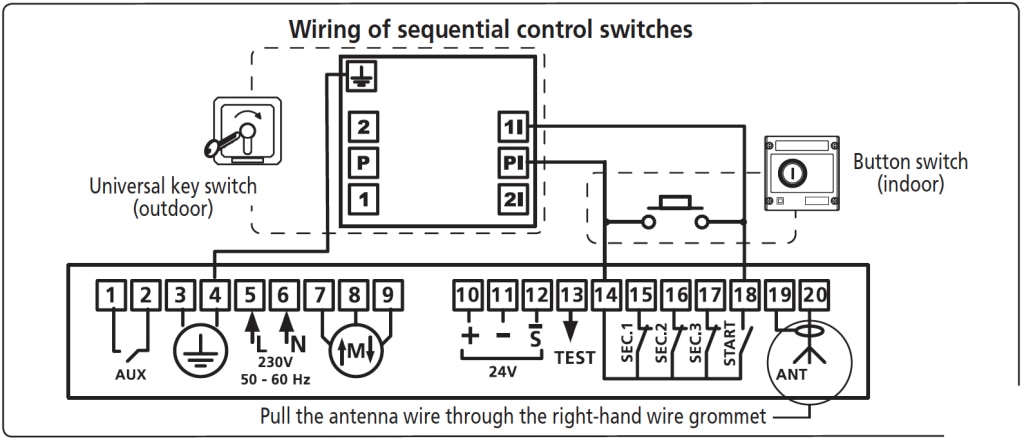
-
RSA Hz and RSA Hz PRO quick programming
-
TROUBLESHOOTING
-
WHAT ARE THE ERROR CODES?
List of operating information displayed by the RSA Hz receiver to quickly view and troubleshoot the installation status
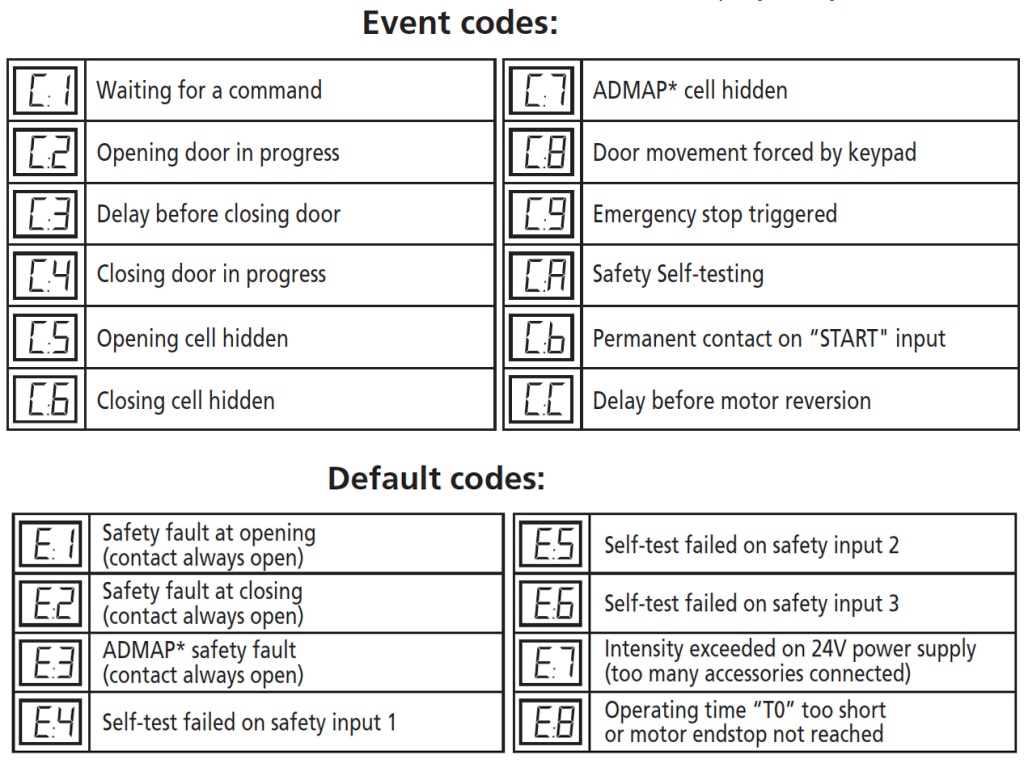
-
ERROR CODE C6
Steps to follow to deactivate cells:
Set settings P2 and P6 to 00
It is vital that you replace the safety devices to comply with standards and to inform the user of the situation and the risk. -
ERROR CODE E2
Steps to follow to deactivate safety edge:
Set setting P1 and P5 to 00
It is vital that you replace the safety devices to comply with standards and to inform the user of the situation and the risk. -
ERROR CODE E8
Steps to follow :
Operating time too short. Set setting t0 slightly above the door operating time. (In seconds)
-
THE REMOTE CONTROL BUTTON MUST BE HELD DOWN TO CLOSE THE DOOR
Steps to follow :
Safety problems, check your accessories and error code.
-
THE MOTOR STOPS MID CYCLE WITH NO ERROR CODE
What to do:
If the motor stops mid cycle and the unit does not display an error, the problem is linked to the motor (winding or capacitor).
Contact your supplier to repair or replace the motor.
-
WHAT ARE THE ERROR CODES?
-
TECHNICAL INFORMATION / SELECTION ASSISTANCE / COMPATIBILITY
-
Motor - DMI5Hz-DMI6Hz
-
How to wire this product?

-
How to program this product?
During this programming procedure, only one motor is to be powered :
1.Switch the motor on
2.Simultaneously press the UP and DOWN keys of the hz transmitter. The motor will run in one direction and then in the other.
3. If the direction of rotation is reversed, press the STOP key until the motor runs in one direction and then in the other. (3 seconds minimum)
4. Adjust end limit :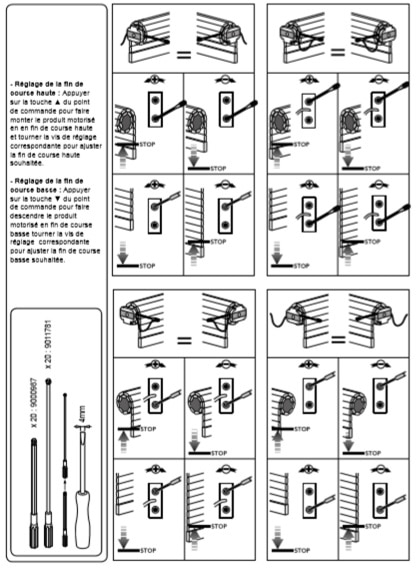
5. Press the transmitter PROG key of approximately one second : the motor will run in one direction and then in the other.
-
Troubleshooting
-
The motor no longer stops at its limit switch
1. Check the link between tube an adaptation.
2. If you have used the manual override and have exceeded the position of the limit switches you have to adjust end limits. -
How to program a transmitter if the originally programmed transmitter on motor is lost?
It is imperative to work with only one motor at a time when canceling the programming.
1. Switch off the power supply to the motor for 2 seconds
2. Switch on the power supply to the motor for 7 seconds
3. Switch off the power supply to the motor for 2 seconds
4. Switch on the power supply : the motor will run briefly in one direction and then in the other
5. With the new transmitter, press the “programming” key until the motor runs in one direction and then in the other.
-
The motor no longer stops at its limit switch
-
How to wire this product?
-
Motor - T5 Autoshort Hz
-
Technical information / selection assistance / compatibility
- What are the detailed features of the product?
- Which product is right for you?
-
Which controls is this product compatible with?
With all SIMU Hz controls and and Somfy RTS controls
- Documentation
-
Installation / setting
-
How to wire this product?
-
How to program this product?
If the installation includes several motors, only one motor is to be powered
1. Switch on
2. Press the UP and DOWN buttons simultaneously until the motor turns back and forth
3. Check the rotation direction using the UP and DOWN buttons; if the direction is reversed, press the STOP button until the motor turns back and forth.
4. Press the UP and DOWN buttons simultaneously until the motor turns back and forth
5. Press the STOP button during 2 seconds the motor turns back and forth.
6. Press the PROG button until the motor turns back and forth. The motor is programmed -
How to add a 2nd control point?
1. Press the PROG (programming) button on the individual control until the motor turns back and forth.
2. Press the PROG (programming) button on the control to be added for 1 second, the motor turns back-and-forth to confirm the addition.
Your new transmitter is paired. -
How to pair a transmitter following a malfunction or loss of the initial transmitter?
1. Disconnect the power supply only on the motor concerned for 3 seconds.
2. Reconnect the power supply for 8 seconds.
3. Disconnect the power supply again for 3 seconds.
4. Finally reconnect the power supply. The motor turns back and forth.
5. Press the PROG button on the new transmitter to be paired (approximately 3 seconds) until the motor turns back and forth.
Your new remote control is paired with the motor. -
How to remove a control point?
1. Press the PROG (programming) button on the individual transmitter until the motor turns back and forth.
2. Press the PROG (programming) button on the transmitter to remove for 1 second, the motor turns back and forth to confirm the removal.
The remote control is deprogrammed.
-
How to wire this product?
-
Troubleshooting
-
My motor does not respond to commands from my remote control
1. Check the remote control’s battery.
3. Check the mains voltage. -
I am lost in the programming
– If you have to keep pressing the buttons on your remote control to move the motor, programming is not finalized :
1. Press the UP and DOWN buttons simultaneously until the motor turns back and forth
2. Press the STOP button during 2 seconds the motor turns back and forth.
3. Press the PROG button until the motor turns back and forth. The motor is programmed -
My motor has lost the end limits
Check the condition of the stopper and replace them if necessary : automatic setting of the up and down end-limits so the roller shutter must be quipped with up and down stoppers.
-
My motor does not respond to commands from my remote control
-
Technical information / selection assistance / compatibility
-
Motor - T8-T8M
- Technical information / selection assistance
-
Installation/ Set up
-
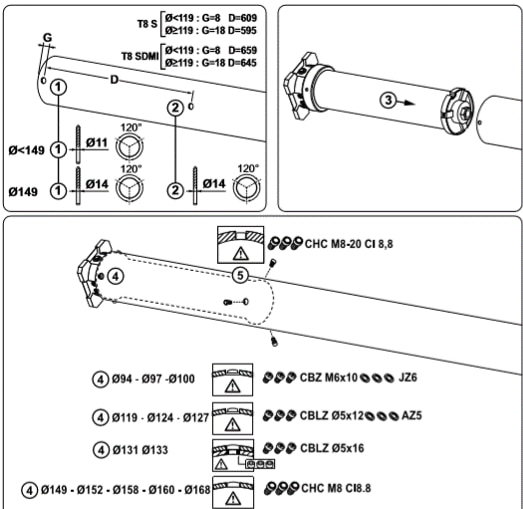
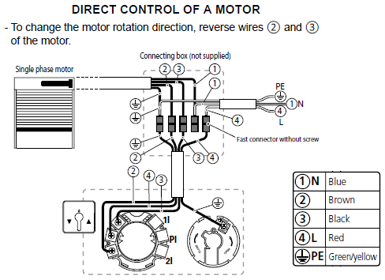
How to fit the motor in the tube?
1st sheme : motor assembly of 300 Nm or less
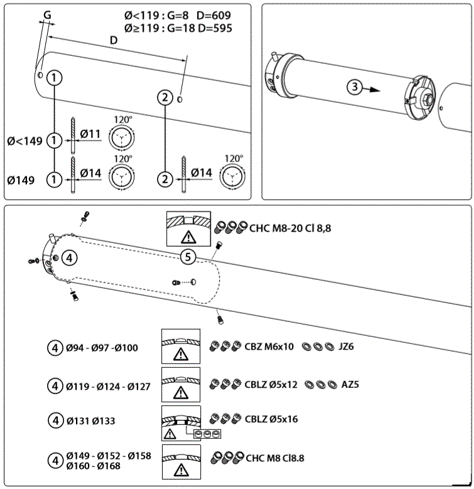
2nd sheme : motor assembly greater than 300 Nm
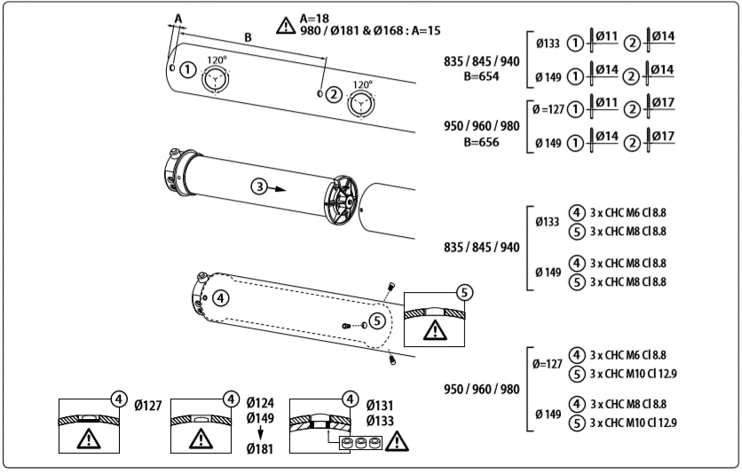
-
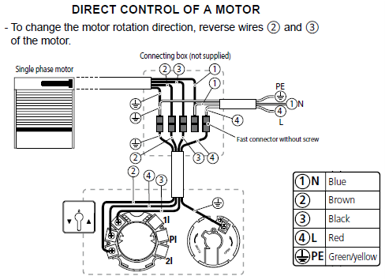
How to wire this product?
With the key box
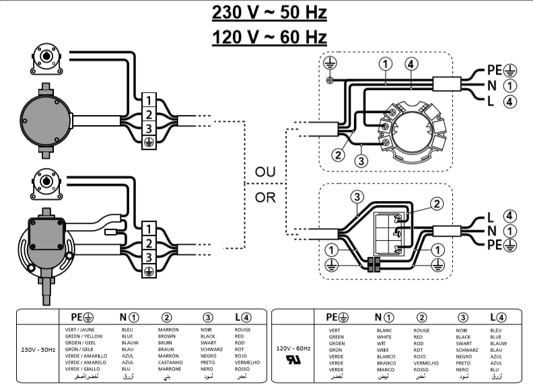
With RSA Hz Pro
-
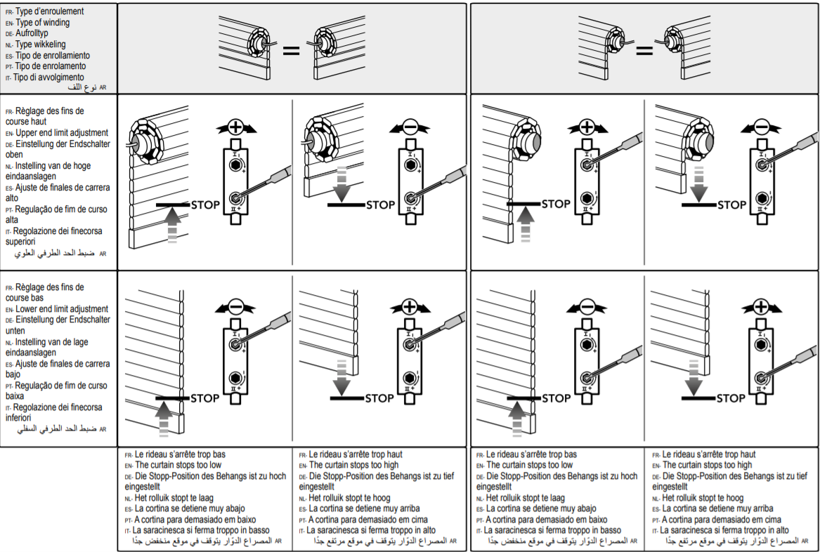
How to set the end-limits?
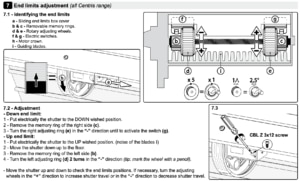
Watch video – Motor rotation direction
Watch video – Identify the setting wheels
Watch video – End-limit switch settings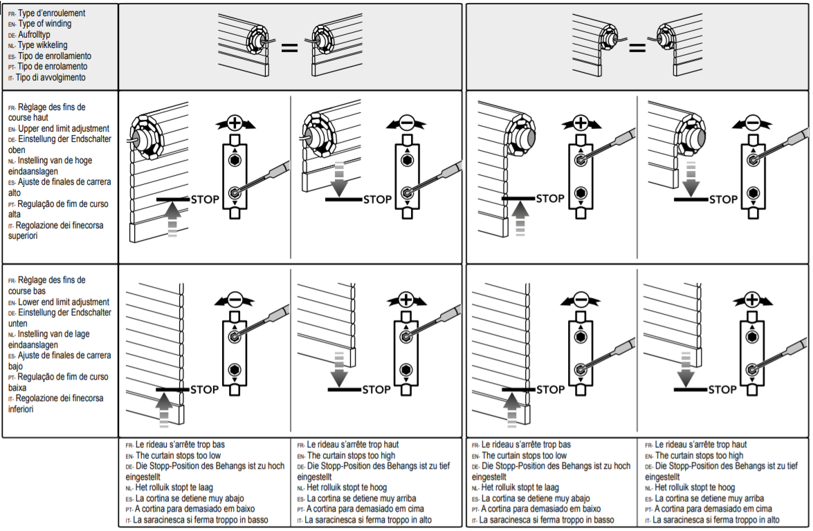
-
How to fit the motor in the tube?
-
Troubleshooting
-
The end limits have been changed from the adjusted positions
1. The crown of the adaptor set is not correctly fixed on the motor base crown or on the tube : check the fixations of the crown on the motor base crown or on the tube.
2. Make sure multiple motors are not plugged on the same wired direct control -
The motor only runs one way
Check the wiring between the motor and the direct control and test the motor connecting it directly to an electrical source
-
The motor does not respond to the control
1. Disengage the manual override
2. No power supply : check the wiring, power supply and fuses
3. Test the motor connecting it directly to an electrical source
4. The thermal protection is actived : wait a few minutes then try again to control the shutter.
5. The microswitch of the end limit security is actived : turn the end limit devices 10 turns in the + direction
6. Check the continuity of contact with the safet-brake
-
The end limits have been changed from the adjusted positions
-
Motor - T8S-T8SDMI
- Technical information / selection assistance
- Documentation
-
Installation / Settings
-
How to fit the motor in the tube?
- How to wire this product?
-
How to set the end-limits?
Watch video – Motor rotation direction
Watch video – Identify the setting wheels
Watch video – End-limit switch settings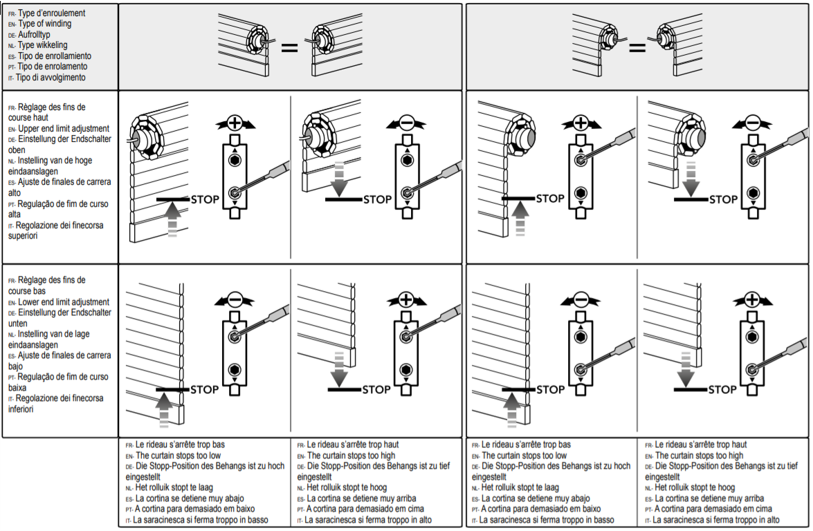
-
How to fit the motor in the tube?
-
Troubleshooting
-
The end limits have been changed from the adjusted positions
1. The crown of the adaptor set is not correctly fixed on the motor base crown or on the tube : check the fixations of the crown on the motor base crown or on the tube.
2. Make sure multiple motors are not plugged on the same wired direct control -
The motor only runs one way
Check the wiring between the motor and the direct control and test the motor connecting it directly to an electrical source
-
The motor does not respond to the control
1. Disengage the manual override
2. No power supply : check the wiring, power supply and fuses
3. Test the motor connecting it directly to an electrical source
4. The thermal protection is actived : wait a few minutes then try again to control the shutter.
5. The microswitch of the end limit security is actived : turn the end limit devices 10 turns in the + direction
6. Check the continuity of contact with the safety brake
-
The end limits have been changed from the adjusted positions
-
Motor - T9-T9M
- Technical information / selection assistance
- Documentation
-
Installation / Setting
-
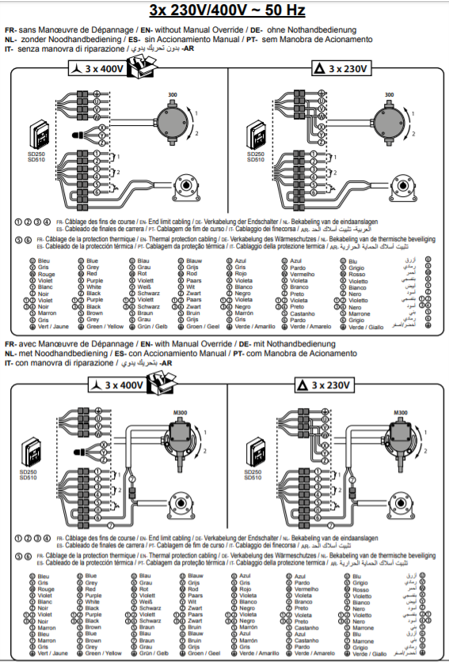
How to install this product with SD250-350-510?
With SD 250

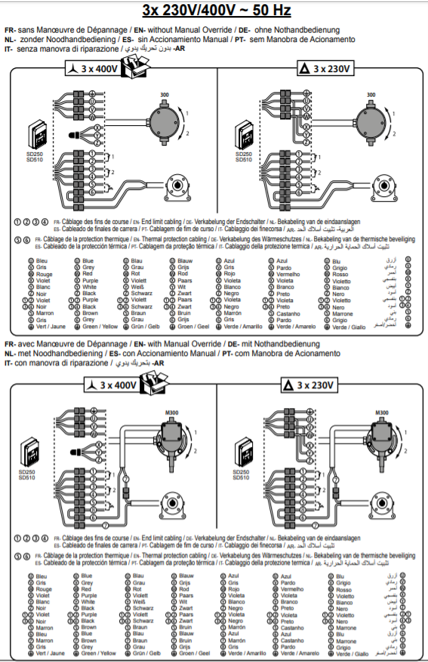
with SD350
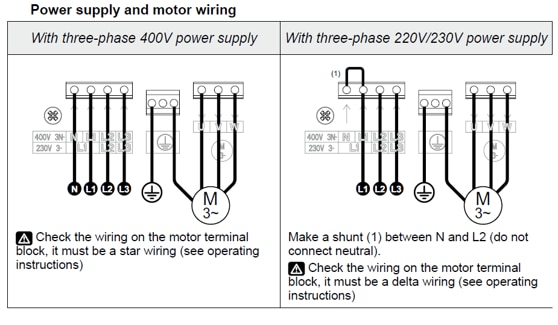
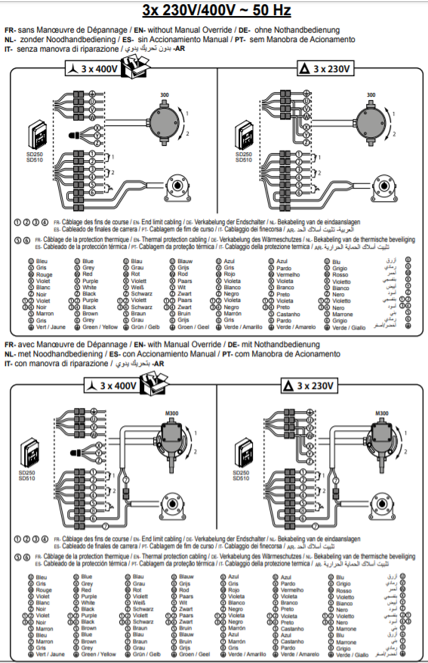
With SD510
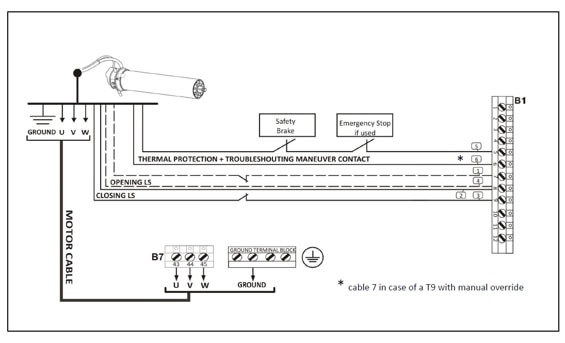
-
How to set the end-limits?
-
How to install this product with SD250-350-510?
-
Troubleshooting
-
The end limits have been changed from the adjusted positions
Check that the motor adaptation is correctly fixed on the base ring of the motor by 3 screws at 120 °
Check that the winding tube on the motor head side is correctly fixed to the adapter by 3 at 120 °. (The screw heads must be embedded in the bore of the tube) -
The motor does not respond to the control
1. If there is one, disengage the manual override
2. Check that the box is powered and correctly wired.
3. Check the adjustment of the limit switches: the safety limit switch may be engaged: make 4 turns in the + direction on each adjustment wheel.
4. Test the motor directly after making a bridge between the FDC inputs (wires 1/2 and 3/4 of the motor) and install a bridge on the safety input.
5. The motor may be in thermal cut-out : wait for the motor to cool.
-
The end limits have been changed from the adjusted positions
-
Motor - T5 EHz - T5 EBHz - T3.5 EBHz
-
TECHNICAL INFORMATION
-
What are the detailed features of the product?
Go to the dedicated product page
T5E Hz product page
T5E BHz product page
T3.5E BHz product page
-
What are the detailed features of the product?
-
SELECTION ASSISTANCE
-
Which product is right for you?
Use the online torque calculator
or view the selection charts in PDF format
-
Which product is right for you?
-
COMPATIBILITY
-
What is Hz and BHz compatibility?
Hz motors can only be driven by Hz transmitters, and BHz motors with BHz transmitters. The two systems can be made interoperable by using a LiveIn2 box.
Hz and BHz transmitters are differentiated by the colour of the LED => red for the Hz protocol and green for the BHz protocol.

-
What is Hz and BHz compatibility?
-
DOCUMENTATION
-
Where can I find the product manual?
Visit the dedicated product page
T5E Hz product page
T5E BHz product page
T3.5E BHz product page
-
Where can I find the product manual?
-
INSTALLATION / PROGRAMMING
-
How to ADD A DIGICODE?
1. Open the Hz radio digicode with the key provided.
2. Presse the RESET button on the digicode for more than 1 second (behind the keyboard).
3. Press the individual transmitter PROG of the motor for 3 seconds => the motor turns in one direction and then in the other.
4. Type the factory code (000000) on the digicode.
5. Briefly press the digicode SET key.
6. Press the PROG button on the digicode for more than 1 second ( behind the digicode keyboard) => 1 led flashes.
7. During the flashing press one channel ( 1 of the 2 large buttons ) until the motor turns in one direction and then in the other.
8. The digicode is programmed. The code can be modified. -
How to ADD A GENERAL REMOTE CONTROL?
1. Press the PROG (programming) button on the individual control until the motor turns back and forth.
2. Press the PROG (programming) button on the general remote control for 1 second; the motor turns back and forth to confirm the addition.
3. Repeat the same operation on all shutters to be added.
Please note, if you already have a multi-channel remote control, remember to select the right channel before pairing. -
How to ADD A TSA+ REMOTE CONTROL?
1. Press the PROG (programming) button on the individual control until the motor turns back and forth.
2. Press the LEFT and RIGHT buttons simultaneously on the TSA remote control until the LED flashes.
3. While the LED is flashing, press one of the 4 buttons on the TSA remote control at the same time until the motor turns back and forth.
Your remote control is paired. -
How to ADD A 2ND CONTROL POINT?
1. Press the PROG (programming) button on the individual control until the motor turns back and forth.
2. Press the PROG (programming) button on the control to be added for 1 second, the motor turns back-and-forth to confirm the addition.
Your new transmitter is paired. -
How to PAIR A TRANSMITTER FOLLOWING A MALFUNCTION OR LOSS OF THE INITIAL TRANSMITTER?
1. Disconnect the power supply only on the motor concerned for 3 seconds.
2. Reconnect the power supply for 8 seconds.
3. Disconnect the power supply again for 3 seconds.
4. Finally reconnect the power supply. The motor turns back and forth.
5. Press the PROG (programming) button on the new transmitter to be paired (approximately 3 seconds) until the motor turns back and forth.
Your new remote control is paired with the motor. -
How to REMOVE A CONTROL POINT?
1. Press the PROG (programming) button on the individual transmitter until the motor turns back and forth.
2. Press the PROG (programming) button on the transmitter to remove for 1 second, the motor turns back and forth to confirm the removal.
The remote control is deprogrammed. -
WHICH END LIMIT SETTING MODE TO SELECT?
Discover the four different methods to adjust your electronic radio motor depending on your installation.
– FULLY AUTOMATIC, SEMI AUTOMATIC LOW, SEMI AUTOMATIC HIGH modes and MANUAL mode -
How to PROGRAM THE MOTOR IN MANUAL MODE?
1. Press the UP and DOWN buttons simultaneously until the motor turns back and forth.
2. Check the rotation direction using the UP and DOWN buttons; if the direction is reversed, press the STOP button until the motor turns back and forth.
3. Using the UP and DOWN buttons, move the shutter in the desired low position: during this operation, continue to hold down the transmitter buttons to lower or raise the shutter.
4. Once the shutter is correctly positioned, press the STOP and UP buttons simultaneously until the shutter starts to move. The shutter should rise on its own (do not hold down the button).
5. Using the STOP button, stop the shutter at the top.
6. Using the UP and DOWN buttons, adjust the desired upper position.
7. Once the shutter is correctly positioned, press the STOP and DOWN buttons simultaneously until the shutter starts to move. The shutter should lower on its own (do not hold down the button).
8. When the shutter is at mid height, press the STOP button and hold it down until the motor turns back and forth (approximately 5 seconds).
9. Press the PROG (programming) button until the motor turns back and forth. The motor is programmed. -
How to PROGRAM THE MOTOR IN FULLY AUTOMATIC MODE?
FULLY AUTOMATIC mode, when the upper and lower end limits are set automatically.
-
How to PROGRAM THE MOTOR IN SEMI AUTO LOW MODE?
SEMI AUTO LOW mode, when only the LOWER end limit is set automatically.
-
How to PROGRAM THE MOTOR IN SEMI AUTO HIGH MODE?
SEMI AUTO HIGH mode, when only the UPPER end limit is set automatically.
-
How to REVERSE THE ROTATION DIRECTION WHEN THE MOTOR IS ALREADY PROGRAMMED?
1. Position the shutter at mid height.
2. Press the UP and DOWN buttons simultaneously until the motor turns back and forth.
3. Within maximum 2 seconds following the motion, press the STOP button until the motor turns back and forth again.
The rotation direction is reversed. -
How to MODIFY THE END LIMITS?
1. Let the shutter stop on the end limit position you want to change.
2. Press the UP and DOWN buttons simultaneously until the motor turns back and forth.
3. Adjust the end limit position using the UP and DOWN buttons.
4. Press the STOP button until the motor turns back and forth to save the new end limit. -
How to SAVE OR REMOVE AN INTERMEDIATE POSITION (IP)?
If you want to save or remove an intermediate position on a roller shutter equipped with a SIMU-Hz radio motor…
-
How to CANCEL PROGRAMMING AND RETURN TO FACTORY SETTINGS (MOTOR RESET)?
1. Disconnect the power supply only on the motor concerned for 3 seconds.
2. Reconnect the power supply for 8 seconds.
3. Disconnect the power supply again for 3 seconds.
4. Reconnect the power supply to the motor. The motor turns.
5. Press the PROG (programming) button for approximately 10 seconds until the motor turns back and forth twice within a few seconds. The motor is in factory settings and ready to be programmed.
-
How to ADD A DIGICODE?
-
TECHNICAL INFORMATION
-
Receiver - Hz
-
Technical information/ selection assistance
-
Which product is right for you?
For all wired motors T3,5, T5, T6 : 2004873
For T5 AUTO and T5E motors : 2004875
-
Which product is right for you?
-
Compatiblity
-
Which controls is this product compatible with?
The Hz receiver is compatible with all Simu HZ and Somfy RTS transmitters
-
Which controls is this product compatible with?
-
Programming / setting
-
How to add a digicode?
1. Open the digicode with the key provided
2. Press the digicode RESET button for more then 1 second (behind the keyboard)
3. Unlock the digicode with the factory code (000000)
4. Press the chosen channel (1 of 2 large buttons) of the digicode
5. Press the individual transmitter PROG of the motor for 3 seconds => the motor turns in one direction and then in the other.
6. Press the PROG button on the digicode for more than 1 second (behind) the digicode keyboard) => 1 led flashes
7. During the flashing press the chosen channel of the digicode until the motors turns in one direction and then in the other.
8.The digicode is programmed. The code can be modified (notice 5050593A) -
How to add a general remote control?
1. Press the PROG button on the individual control until the motor turns back and forth
2.Press the PROG button on the genral remote control for 1 second : the moter turns back and forth to confirm the addition
3. repeat the same operation on all shutters to be added
please note, if you have a multi-channel remote control, remember to select the right channel before pairing. -
How to reverse the rotation direction when the receiver is already programmed?
It’s not possible to reverse the rotation direction when the receiver is already programmed. You have to cancel programming and do a new one
1. Only on the hz receiver concerned, switch off the power supply to the receiver for 2 seconds.
2. Switch on the power supply to the receiver for 7 seconds
3. Switch off the power supply to the receiver for 2 seconds
4. Switch on the power supply : the motor will run briefly in one direction and then in the other
5. Press the PROG (programming) button for approximately 10 seconds until the motor turns back and forth twice within a few seconds.
6. The receiver is in factory settings and ready to be programmed.
7. Press the UP and DOWN buttons simultaneously until the motor turns back and forth
8. Check the rotation direction using the UP and DOWN buttons; if the direction is reversed, press the STOP button until the motor turns back and forth.
9. Press the PROG (programming) for 1 second : the motor turns back and forth. The receiver is programmed. -
How to wire this product?


-
How to program this product?
During this programming procedure, only one motor is to be powered :
1. Switch on the power supply to the receiver : l the motor turns back and forth
2. Press the UP and DOWN buttons simultaneously until the motor turns back and forth
3. Check the rotation direction using the UP and DOWN buttons; if the direction is reversed, press the STOP button until the motor turns back and forth.
4. Press the PROG (programming) for 1 second : the motor turns back and forth. The receiver is programmed.
-
How to add a digicode?
-
Troubleshooting
-
I have to keep pressing the remote key to open or close my roller shutter
Programming has not been validated. Press the PROG (programming) for 1 second : the motor turns back and forth
-
I have to keep pressing the remote key to open or close my roller shutter
-
Technical information/ selection assistance
-
Receiver - Micro receiver Hz
-
Technical information/ Compatibility
- What are the detailed features of the product?
-
Which motors is the micro-receiver Hz for rolling shutters compatible with?
All SIMU or SOMFY wired motors whose intensity doesn’t exceed 3A in 240V and 3,4A in 120V
-
Which lamps is the micro-receiver Hz for lighting compatible with?
For halogen lamps max control output 500W.
For compact fluorescent / LES lamps max control output 60W.
-
Which transmitters is this product compatible with?
With the entire range of SIMU-HZ or Somfy RTS transmitters
- Documentation
-
Installation / programming
-
How to wire micro-receiver hz for rolling shutters?
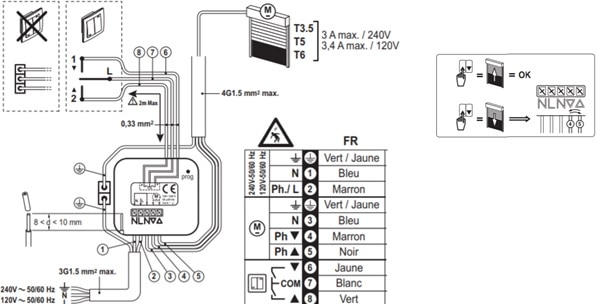
If no wired control is connected to the micro-receiver, connect wires 5,6 and 7 together
-
How to wire micro-receiver hz for lighting?
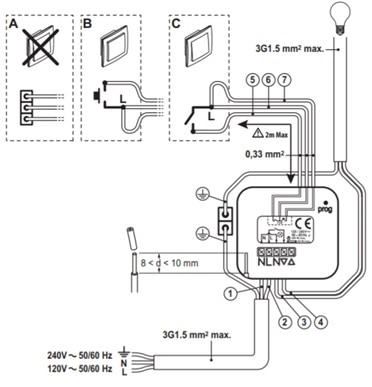
If no wired control is connected to the micro-receiver, connect wires 5,6 and 7 together
-
How to program a control point on a micro-receiver hz for rolling shutter?
1. Press the receiver’s PROG button for 3s, the motor moves the roller shutter up and down
2. Press the PROG button on the transmitter for 1s, the motor movesthe roller shutter up and down -
How to program a control point on a micro-receiver hz for lighting?
1. Press the receiver’s PROG button for 3 s, the light will switch on for 2s.
2. Press the PROG button on the transmitter for 1s, the light will switch on for 2s. -
How to erase the programming of a micro-receiver hz for rolling shutter?
Press the PROG button of the receiver for more than 7s until the roller shutter moves up and down once then a second time a few moments later.
-
How to erase the programming of a micro-receiver hz for lighting?
Press on the receiver’s PROG button for more than 7s, the lighting will switch on for 2s twice in succession
-
How to wire micro-receiver hz for rolling shutters?
-
Technical information/ Compatibility
-
Receiver - 433Mhz (ANTERIOR PRODUCT)
-
Technical information
-
Is this product compatible with current remote control?
No the radio protocol radio is different
-
How to find a compatible remote control?
Simu no longer sells this product and current remote controls are not compatible
-
Which product to replace the 433MHz receiver?
SD100Hz reference 2009612 is a substitute to this product
-
Is this product compatible with current remote control?
-
Technical information


